Saturday, December 12, 2009

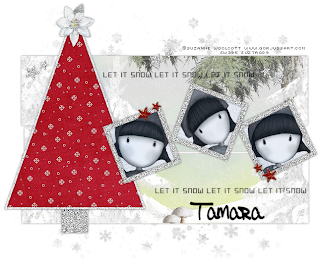
Let It Snow


Supplies needed are as follows:
Tubes of choice i used 3 from Suzanne Woolcott
Scrapkit belongs to Tamara its called Winter Wonderland and you buy it at her site.
Template belongs to Melissaz and its one of xmas ones its christmas temp3.
Fonts and mask of choice.

Open the template and delete the cr layer. Choose one of the gorgeous papers from Tamaras kit and make a new layer above the merged rectangle layer. Now go to selections, select all and make sure you on the empty layer and copy and paste the paper into the selection ok. select none. Now go to the rectangle layer and select it then go back to the paper layer and go to selections invert and then press delete on your keyboard. now xout the rectangle layer. Now lets copy and paste our tubes and place to your liking. I changed the blend mode to luminance legacy. I then selected each square frame and changed the colours to a very light grey then applied noise found in your psp at 60 then i went to sharpen it as well, gives a nice sharp look ay. Then add a slight drop shadow. I then xout all other layers and merge my frame,tube and background together. I then unx all the other layers and moved the tube layer down a bit. Ok lets select our xmas tree layer and i used paper17 to fill it. Now keep your tree layer selected and go to selections modify by 2 then make a new layer above your tree layer, i then flood filled it with a light grey colour, then go to selections contract by4 and then press delete on your keyboard. Now add noise found in your psp then go to sharpen. ok if you are adding snow like i have i already had a snow animation and cant remeber where i got it from. It has 8 layers. I just exported each frame of snow over from ani shop. Make a new layer above your tree layer and add your snow, continue to do this for another 7layers or the amount of layers your snow has.
I then added the words let it snow and put one at the top and one at the bottom. Add any other
embellishments of your choice. Add the your name and the cr. Now if animating just keep one snow layer open and xout the rest of them. merge layers and copy to ani shop. back to psp and unx the next snow layer and merge all, copy to ani shop and paste after current frame. Do this till you have all your snow layers over. Now change the frame speed to 30, save your tag. hope you enjoyed this tutorial. hugs Suz

Believe In the Magic of Winter


Supplies needed are as follows:

Tube of choice mine is the awsome artwork of Suzanne Woolcott and you can purchase her tubes at her site.

Scrapkit of choice or you can purchase the one i used from Tamara at her site, its called Winter Wonderland. thanks Tamara this is one gorgeous kit to work with.

Fonts and maybe a mask if you choose to use one.

Snow is animated and made with the filter Adrenaline snowflakes.

Ok lets start shall we. Open a new canvas 600x600 and flood fill with white. Now copy and paste frame ice1 or one of the others she has in the kit. Now choose a background, she has some awsome papers in this kit ay. Once you have choosen one place it below your frame layer and get your magic wand and click inside the frame and then go to selections modify by 6 then selections invert and then on your paper layer press delete on your keyboard.
Now copy and paste other embellishements of your choice. Then add your tubes. I then animated mine. I made 3 layers and then with my magic wand clicked inside the frame layer and then went to one of my empty layers and applied some snow. For the other 2 snow layers i just moved the radom seed up and then on the last one i moved it back a bit. NOw add the wordart from the kit and your cr and then add your name. Now if you are not animating merge layers and save your tag. If animating xout 2 of the snow layer and merge the rest and copy to ani shop. Back to psp and unmerge your layers. xout that snow layer and unx the next one and merge all, copy to ani shop and paste after current frame. Go back to psp for the last time and repeat above. Ok i changed my frame settings to 20. Save your tag. All done. hope you enjoyed this tutorial.
hugs Suz

Friday, November 20, 2009

Santa Baby

Supplies needed are as follows:

You will need Cindas Template and this is in her xmas templates and its template01. Her templates are awsome. thanks Cin ay.

Tube of choice, the art im using is Ismael Racs and you can get his tubes at AMI

Ok lets make our tag. This is not a hard tag to make. Open the template and delete the cr layer and background layer.

Get your bigger tube or image and copy and paste as a new layer and place this in the white frame. Place to your liking and then go to selections select all then modify by 4 and then selections invert and on your tube layer press delete. Now copy and paste the smaller tube and place to your liking on your tag. Now all you need to do is dress your tag up by making new layers and adding patterns or just changing the colours of the template. Add some sparkles or glitters, anything you like ay. I also added a wee heart to the tube and then put the name on the tube too. Just something a bit different ay. To finish the tag off you might like to add a mask or you can do what i did. I duplicated the circle and then added guassian blur of 15 then added VM Extravaganza, transmission at 4. Now just add your name and cr. All finished. Hope you enjoyed this tutorial. hugs Suz

Monday, November 9, 2009

Merry Christmas


Supplies needed are as follows:
Scrapkit of choice the one i used belongs to Tamara of Just A Girls Designs its called White Christmas. Artwork is Suzanne Woolcott and you can get her tubes at her site. Mask of choice and fonts of choice.
Ok this is an easy tag to make. Open a new canvas 600x600 and then copy and paste one of the papers from the kit. Apply your mask. Now copy and paste the window frame and resize to your liking. Now the fun part. Just copy and paste your tubes and put where you want them. Decorate the window up a bit. Lots can be done with this tag ay. I did not animate this one, I just put the some snow in behind the window frame ay. Now add your name and cr. All done. hope you enjoyed this tutorial ay. hugs Suz
Tamara thanks heaps for the gorgeous kit ay. I enjoyed playing with this one.

When Life Gives You Snow Giggle


Supplies needed are as follows:

Scrapkit of choice or you can use the one
I used. Its called White Christmas and
you can buy that from Tamara at her site
Just A Girls Designs Font of choice and
mask of choice. The mask i used belongs
to Chelle and you can get that at her site
Its mask 219, just click on masks ay.
This tag is animated with snow and i dont
know where i got that snow from soo if anyone knows i would be more than happy to credit them.
The artwork ive used is Maxine Gadd and you can buy the tubes at MPT

Ok lets make our tag. Open a new canvas 600x600 and flood fill with white. make a new layer and flood fill that with one of the papers from the kit. Now apply your mask. Now go and copy and paste frame1 from the kit. Now what i did next was copy and paste another paper from the kit.
I clicked inside the frame and went to selections invert and make sure you are on
the paper layer and press delete on your keyboard. Now add the xmas tree and your tubes and anything else you want on your tag ay. I put the words When Life gives you snow giggle around my tag. You can add what you want there ay. Now add your cr and name. the animated snow is 10 layers and i copied each frame from ani shop onto a new layer and repeated doing that for all 10layers. Then I
copied them all back to ani shop one by one. Yes its the long way for me but its
best i do that. I know where I am then. You could use the filter Adrenaline snowflakes for your snow too. thats all there is to this tag ay. Hope you enjoyed it.
hugs Suz

Saturday, October 17, 2009

Dance with Me

Supplies needed are as follows:

Scrapkit of choice the one im using belongs
to Tamara of Just A Girls Designs its called
Midnight Seranade and omg its an adorable
kit, love the wee kitties ay. thanks Tamara.

Template belongs to Vix and you can get this
at her blog its template 04 Vixs blog.

Mask belongs to Vix too and you can get that
at her tut site under the goodie section
Vixs tutorials its mask 148.

Artwork used belongs to Suzanne Woolcott
you can purchase her tubes at her site.

Ok lets make our tag ay. Open Vixs template
and delete the cr layer, I also deleted the wording
layers as well.
Now this is an easy tut ay. All you really have to
do is select each circle layer and make a new layer and use one of the papers from the kit as your
preferred background ok. Do this for all three layers. I then just used another paper for the outer circles set at size 5 ok. Now just place the skyline2 element where you want and resize
to 60%. then just grab your magic wand and click inside the outer cirle of the middle circle and
go to selections modify by 2 then selections invert and make sure you are on the skyline layer
and press delete on your keyboard. Now just start adding other embellishments from the kit. I
added the cute kitty and the keyboard and the moon. Just make it how you want it to look ay.
Now all you have to do now is make a new layer above the white background layer and then
add your mask ay. Now add your cr and your name. I also added the wording Dance with me
all night long.
hope you enjoyed this wee tut ay.
Hugs Suz

'MyFreeCopyright.com